DIY Agate Coasters - Photo Credit: Popsugar
With the cost of living going up every day, we’re all looking to save a buck or two. That doesn’t mean that we need to sacrifice living fab to do it! Especially when it comes to home décor, there are endless DIY projects to be found online. All it takes is a little elbow grease and the know-how (heck, sometimes it doesn’t even take elbow grease). We scoured the internet for some impressive, yet easy to manage DIY projects. Here are some of our favorites…
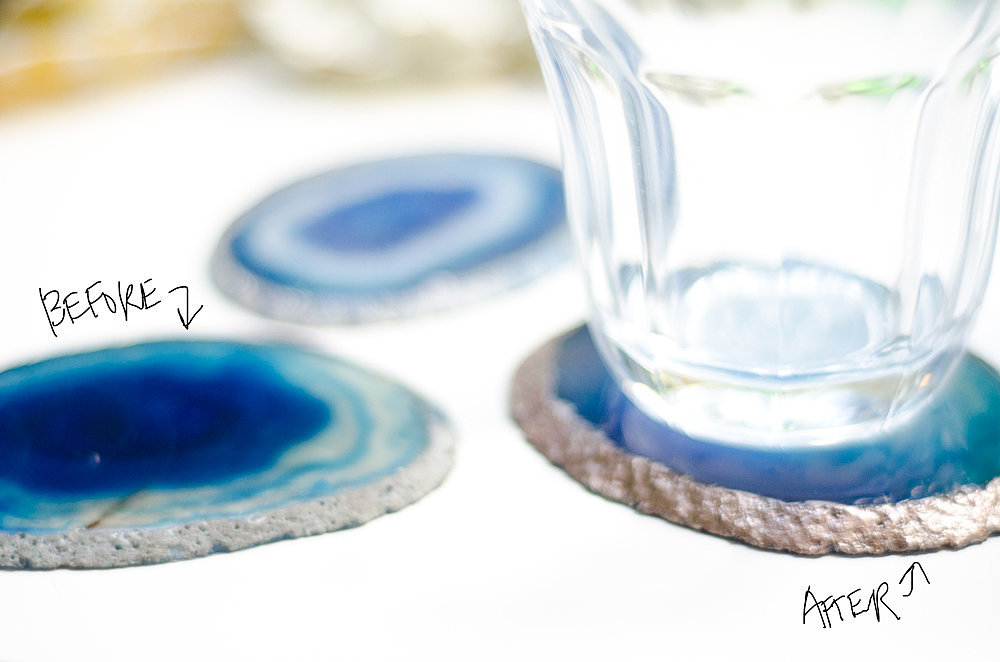
1. Gilded Agate Coasters. We knew we had to share this idea once we saw it on PopSugar. Apparently it’s relatively inexpensive to buy pieces of geode wholesale. This means the more you buy, the less it costs. Kevin O’Gara tried it out and ended up spending $4.25 a slice, and he only bought six! We’ve seen these for sale at places like West Elm for more than $60 for a set of four!
To make them, you first buy as many geode slices as you wish. They used three- to four-inch non-drilled slices from Crystal River Gems. Then you just get nail polish (they suggested gold – like metallic, gold leaf gold) and fill in the craters and cracks on the outer level. Let them dry and voila… beautiful, chic coasters for your coffee table. These make great gifts too! Detailed instructions on how to make them below.
2. Fancy Marquee Light. The coaster project was easy; this one is a bit more advanced. You will need some tools for this one! However, the finished product is that much more impressive. You know those marquee lights that are all the rage right now? You’ll find them at coffee shops in gentrified neighborhoods, or in the windows of hip boutiques. They also look pretty amazing paired alongside some modern, industrial décor.
Meg from the blog “Happy Looks Good on You” outlines the project in a step by step tutorial. They started off with a quarter in chip board, drew/traced an ampersand on it and drilled holes for the lights. Then they cut out 3.5-inch poster board strips and fit it around the edges of the ampersand, attaching it with tape. They painted it, and popped the lights through, and ended up with a really impressive product! Click below to see her tutorial.

3. Geode Bottle Stoppers.Here’s another super easy one we couldn’t resist sharing. Stoppers to top open liquor bottles in your bar, wine bottles, or basically anything that uses a cork. These are adorable, and will add pizzazz to any mini bar. Emily from the blog Cupcakes and Cashmere thought of this idea when she was adding items to her wedding registry and came across similar ones for upwards of $60 each!
So what did she do? She made her own version for around $7 a pop! All she did was pick out an assortment of crystals with flat-ish bottoms. She then got cork bottle stoppers and used craft glue to attach the crystals to the larger end of the stoppers. How amazing do these look? You can find her detailed in instructions below.

4. Stencil Text Pillows. Here’s another very easy one for you! All this one takes is fabric markers, a pillow (or any other fabric item you’d like to decorate), a pencil and a letter stencil. Amanda from Wit & Whistle (http://witandwhistle.com) used a linen pillow cover that looked somewhat like burlap, and it turned out fantastic! She suggests using this same method on anything from tea towels to aprons to t-shirts, placemats, or cloth napkins.
First, what you need to do is choose a quote. This can be a quote from a famous person, song lyrics, an excerpt from your favorite book, or just about anything. Use a pencil and the letter stencils to outline the letters of the quote onto the fabric. We would suggest using a ruler to ensure you are placing the letters in a straight line. Once you’ve done that, just color inside the pencil with the fabric marker! Make sure you don’t skip the pencil step, because you can erase pencil, but not the fabric marker. When you’re done, it will look something like this (click the image for full instructions):

5. Succulent Pallet Table. This project is a bit more advanced, and will require some tools, as well as basic carpentry skills. We just couldn’t help sharing it because it’s so beautiful! This would be the perfect patio table, it’s even nice enough to serve as a breakfast nook table or coffee table, but it’s best left outside to drain the water. The folks at Far Out Flora detailed their experience making the planter, and theirs turned out fantastic!
Basically, they deconstructed some old palates, formed a frame with some old wooden legs, and fitted the palate slabs on top. They made theirs transportable by engineering the middle portion (the portion that holds the succulents) into a removable section. They then used succulents like Sempervivum, Sedum, and a hint of Orostachys iwarenge to make this arrangement look stunning. They detail their process on their website, click the picture below for step by step instructions and pictures!

Happy crafting!